


12 Modern Christmas Decor Ideas Garland for Every Room
There's something magical about walking into a home decorated with


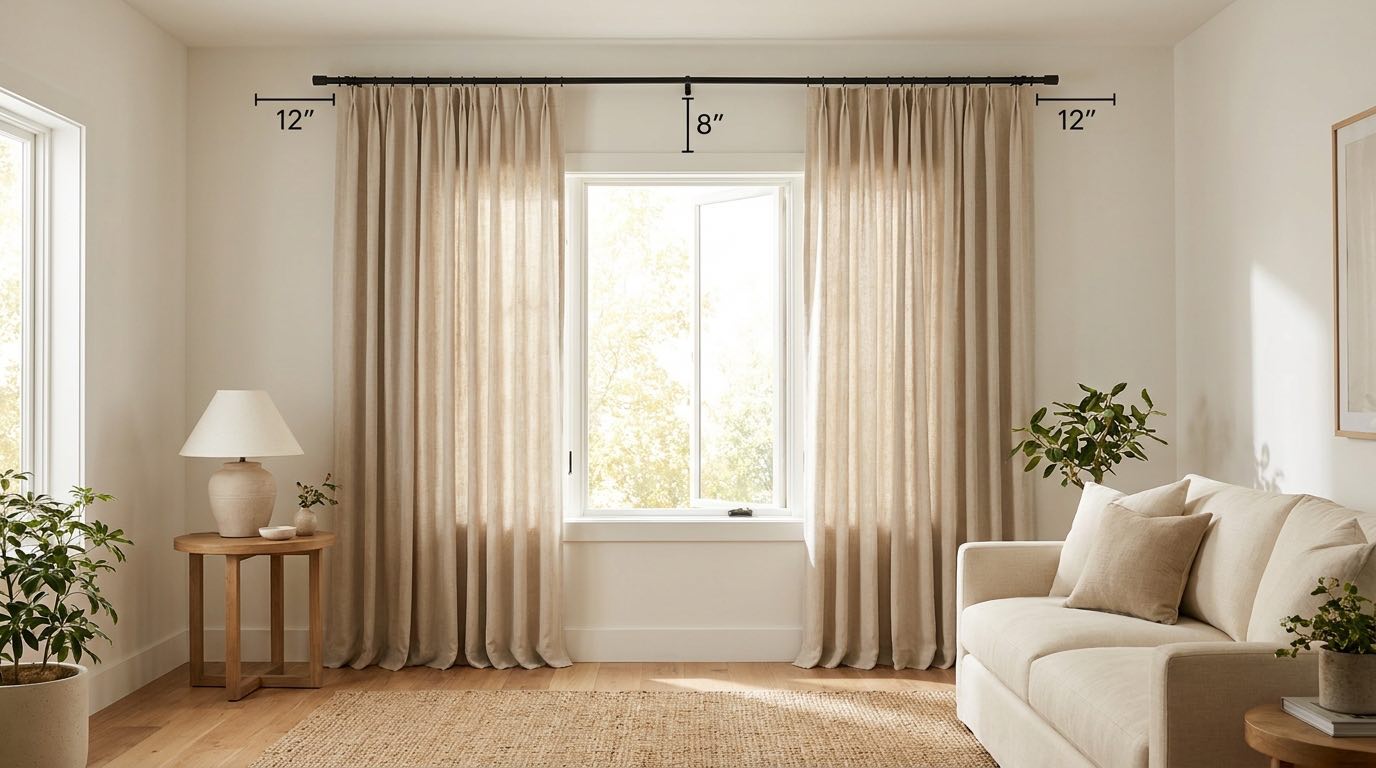
Learning how to hang curtains the right way comes down to three things: accurate measurements, smart rod placement, and secure brackets. Get those right, and everything else falls into place.
The good news is that this is a beginner-friendly project. You don’t need special skills, just a bit of patience and the right tools.
Hanging your curtains a little higher and wider than the window frame can make the whole room feel taller and more open. This guide walks you through measuring, gathering tools, placing brackets, choosing wall anchors, working with different curtain styles, and avoiding the most common mistakes people make.

If you just want the short version, here it is. These numbers are common starting points, not hard rules, so adjust them based on your window, ceiling height, curtain style, and how much wall space you have.
| Measurement | Recommended starting point |
| Rod height | 4–6 inches above the window frame |
| Rod extension | 4–6 inches past each side |
| Wider designer placement | Up to 8–10 inches past each side when space allows |
| Curtain fullness | Combined panel width of about 2–2.5 times the usable rod width or the total area the closed curtains must cover |
| Floor clearance | About ¼–½ inch for a clean, practical finish |
| Center support | Add one when the rod is long, heavy, or beginning to bow |
When wall space allows, a wider placement can look even more polished, and a fuller fabric width adds a richer, more finished drape.
| Project detail | Estimate |
| Time required | Around 30–60 minutes per window |
| Difficulty | Beginner |
| Estimated DIY cost | Depends on the rod, curtains, and hardware |
| People needed | One person; two for long or heavy rods |

Before you pick up a measuring tape or a drill, decide on your mounting style and curtain heading. These choices affect exactly where the rod goes and how long your curtains need to be, so it’s worth settling them first.
An outside mount places the rod above and beyond the window frame, on the wall itself. It’s the most common setup for full-length curtains, and it can make a window look taller and wider than it actually is.
An inside mount fits the hardware within the window opening. This works better for café curtains, tension rods, or spots where you don’t have much wall space to work with. Keep in mind the window frame needs enough depth for an inside mount to work properly.
The heading is the top part of the curtain that attaches to the rod. Common types include:
The heading style changes exactly where the fabric begins in relation to the rod. Because of this, it’s smart to choose your heading before you calculate the final curtain length. Rod-pocket curtains, ring-and-clip curtains, and pinch pleats all hang at slightly different points below the rod, so the same “curtain length” can look different depending on the heading.
Lightweight sheers can use a slimmer, lighter rod without any trouble. Blackout, lined, or velvet curtains are heavier and need a sturdier rod along with stronger brackets. Whatever you choose, check the weight limits listed by the rod, bracket, and anchor manufacturers before you buy or install anything.
Here’s everything to gather before you start.
Tools
Materials
Make sure your drill bit and anchor type actually match your wall material, since the wrong pairing can weaken the hold. It also helps to have a second person around for long rods and heavy curtains, since holding a rod steady while marking or drilling is much easier with an extra set of hands.
Once you know how to hang curtains step by step, the whole project feels much less intimidating. Before you pick up the drill, finish all your measurement decisions first, since drilling is much harder to undo than erasing a pencil mark.

Start by reading the fabric care label. Wash washable curtains before taking your final length measurement, since some fabrics shrink a little after their first wash.
Iron or steam out any packaged folds and wrinkles so the fabric hangs smoothly. Confirm that both panels end up the same length once they’re clean and pressed. Never steam or iron a fabric without checking its care instructions first, since heat can damage certain materials.
Washing and pressing panels before measuring matters because shrinkage can quietly change your finished dimensions, throwing off a length that looked perfect on the label.

Measure the full width of the window, including the trim. Decide how far you want the rod to extend beyond each side, then add that to your window measurement to get the total rod width.
Measure the usable width of the curtain rod between the finials or end stops. Multiply that width by about two for standard fullness, or up to 2.5 for lightweight sheers and a fuller appearance. Then divide that total width between however many panels you’re using.
Example calculation
For a 60-inch window with a rod extending 6 inches on each side:
One thing to watch for: some product listings show the width of a single panel, while others show the combined width of a pair. Always double-check which one you’re looking at before you order.

Start around 4 to 6 inches above the window frame for a standard installation. A rod placed closer to the ceiling can make the room and the window appear taller, but don’t automatically push it all the way to the ceiling just because the ceiling is high.
For width, extend the rod about 4 to 6 inches beyond each side for a normal look. If you have plenty of wall space and want the curtains to stack fully away from the glass when open, extend it farther. Just check for nearby walls, cabinets, vents, or closely spaced windows first, since an extra-wide placement doesn’t always work well for corner windows or windows sitting close together.
Measuring curtain length
There are a few standard lengths to choose from:
Floor-length curtains tend to be the most versatile choice for living rooms and bedrooms. Whichever length you choose, measure from the point where the fabric will actually begin, not automatically from the very top of the rod, since the heading style changes that starting point.

Hold or measure the first bracket at your chosen height and side position, then lightly mark every screw hole with a pencil. Measure from a fixed reference point rather than trusting the window frame to be perfectly level, since older frames often aren’t.
Transfer the same measurements to the second side, then use a level to check that both sets of marks line up. Before you drill anything, recheck the total rod width one more time.
Practical tip: Try making a simple cardboard bracket template. Trace your bracket’s screw holes onto a piece of cardboard, cut it out, and use it to repeat the exact same hole positions on both sides, or across several windows in the same room.

Run a stud finder over every spot where a bracket will go. Screwing directly into a wall stud usually gives you the strongest possible hold.
Where there’s no stud available, install a suitable wall anchor instead. Don’t rely on basic plastic anchors for heavy curtains unless their rated load is actually high enough for the weight you’re hanging. Before drilling, check for hidden electrical wires or plumbing, and always follow the anchor manufacturer’s instructions for hole size and installation.
Safety note: Wear eye protection while drilling, and make sure your ladder is stable and on level ground before you climb it.
There’s no single anchor-weight number that works for every wall, so check the specific rating on the package against your curtain and rod weight.

Drill pilot holes at the correct size for your anchors or screws. Insert wall anchors wherever they’re needed, then position and secure the first bracket, driving the screws in snugly without overtightening.
Install the second bracket the same way, then set the empty rod into both brackets and check it with a level. If your rod is long, heavy, or starting to bow in the middle, install a center bracket for extra support.
A center support is especially useful for wide windows, telescoping rods, and heavier curtain fabrics, since a rod spanning a large window without one is much more likely to sag over time.

Remove one finial from the end of the rod. Add your panels using whichever heading they have, whether that’s grommets, pockets, rings, clips, or hooks, making sure the front of both panels faces the same direction.
Replace the finial, then lift the rod back into the brackets and tighten any bracket set screws. Do one final check with the level, then open and close the curtains a few times to make sure they move smoothly.
Check that the fabric clears the floor properly and stacks the way you want when open. Adjust the rings or pleats so the folds sit evenly spaced across the rod.
Once everything is hung, gently arrange pleated curtains into even folds and loosely tie them in that position for a day or two. This helps train the fabric to hold cleaner, more consistent folds over time.

You already know how to install the rod itself, so this section only covers how each curtain style attaches once the rod is up.
Remove the finial, then feed the rod straight through each grommet opening. Arrange the fabric so the first and last folds face toward the wall. Grommets naturally create a modern, even wave pattern as the curtain moves.
Slide the rod through the fabric pocket or through the hidden tabs sewn into the back. Rod-pocket curtains can be a little harder to open and close often, since the fabric bunches directly on the rod. Back tabs hide most of the rod from view and tend to create cleaner, more tailored folds.
Space the rings evenly along the rod, or attach clips at consistent intervals across the top of the fabric. Where you clip the fabric can slightly change the finished curtain length, so keep that in mind when measuring. Rings generally make curtains the easiest style to open and close smoothly.
Insert the correct drapery hooks into the pleated heading, then attach each hook to a ring or a carrier on a traverse rod. Keep the spacing equal across the whole curtain. Avoid pushing hooks through the visible front fabric, since they’re meant to stay hidden from the room side.
Use studs whenever your bracket placement allows it. When a stud isn’t available, use a properly rated drywall anchor instead. Just make sure the screw size and anchor type are actually compatible with each other.
Drill slowly to reduce the chance of cracking the surrounding plaster. Use a drill bit suitable for your plaster and the material behind it. Because plaster walls may contain wood or metal lath, identify the wall construction and follow the anchor manufacturer’s drilling instructions before starting. Try not to drill repeatedly in the same spot, since older plaster can crumble with repeated pressure, and very old plaster walls sometimes need specialized anchors.
Use a masonry drill bit designed for hard surfaces. Drill into solid material rather than weak or crumbling mortar whenever your hardware instructions recommend it, and use masonry plugs or anchors rated for the wall type. A hammer drill can make the job easier when you’re working with especially hard masonry.
If you can’t identify your wall material, or you suspect there’s wiring, plumbing, or unstable plaster behind it, it’s worth consulting a professional before drilling.
Tension rods work best for inside-mounted, lightweight curtains. They’re a solid option for renters, café curtains, and small windows, but they need a firm window recess to stay in place. They’re not suitable for every curtain weight or for wider openings.
Clean and dry the wall surface thoroughly before applying adhesive hooks, and follow the required curing time before hanging anything. Check the weight rating printed on the packaging, and avoid textured, dusty, damp, or damaged wall surfaces, since adhesive won’t hold well on any of those.
Some no-drill products attach to window trim or use very small pins instead of screws. Follow the manufacturer’s installation limits closely, and check whether the product is actually rated for your specific trim and curtain weight. Tap-in brackets avoid standard drilling, but their small pins may still leave minor holes in the window trim or wall.
It’s worth noting that no-drill methods aren’t automatically damage-free in every situation. Adhesive products in particular can pull off paint or leave a sticky residue when removed.

Hanging the Rod Too Low Placing the rod directly against the top of the window frame can make the whole window, and the wall around it, look shorter than it is.
Choosing a Rod That Is Too Narrow A narrow rod keeps the panels from stacking outside the glass when open, which can block daylight even when the curtains are pulled back.
Buying Curtains That Are Not Full Enough Panels should still show visible folds when closed. Flat, stretched-looking fabric usually means the panels weren’t wide enough for the rod.
Using Curtains That Are Too Short Curtains floating several inches above the floor can look like a mistake, unless you intentionally chose a sill or apron length for that spot.
Ignoring the Curtain Heading Grommets, clips, rings, pockets, and hooks all change exactly where the fabric begins, which affects your finished length even if the panel itself is the same size.
Installing Heavy Curtains Without Proper Anchors The wrong anchor can pull straight out of drywall under the weight of heavy fabric, damaging the wall in the process.
Skipping the Center Bracket Long rods can bow in the middle over time, especially with lined or blackout curtains, which adds significant weight.
Using the Window Frame as a Level Window frames, ceilings, and floors aren’t always perfectly straight, especially in older homes. Use an actual level, and step back to visually check the finished position before you call it done.
Before you consider the project finished, run through this list:
Working through this checklist is the fastest way to confirm you’ve learned how to hang curtains correctly from start to finish.
Once you break it down, learning how to hang curtains really comes down to three things: measure carefully before you buy or drill, position the rod high and wide when your room allows for it, and use hardware that’s actually rated for your wall and curtain weight.
It’s a beginner-friendly project as long as you take your time. Double-checking each measurement before you commit to drilling is the single best way to avoid the most common mistakes.
Yes, an outside-mounted curtain rod can be installed above existing blinds to add softness, extra privacy, insulation, or more light control. Just leave enough clearance so the blinds can still raise and lower without interference.
Bay and corner windows usually call for specialty hardware like bay-window rods, corner connectors, or ceiling tracks, since standard straight rods won’t wrap the angles. Keep in mind that ordinary finials can sometimes prevent rods from meeting neatly at the corner joints.
Yes, ceiling-mounted rods or tracks work well when there’s little wall space above the window, or when you want a floor-to-ceiling look. The hardware needs to be anchored into suitable ceiling framing, or into anchors rated for ceiling installation.
A single long rod can visually connect two nearby windows, as long as you use enough support brackets along the span. Factor in both the wall space between the windows and the total weight of the curtains before choosing this setup.
Curtains shouldn’t rest directly against a hot radiator, baseboard heater, or heating vent, since this can be a fire hazard. Follow the clearance distance required by your heater’s manufacturer, and choose a shorter curtain length in that area if needed.
Jackson Reed is a home DIY and projects expert with over eight years of experience turning everyday ideas into practical, achievable improvements. He specializes in hands-on projects, creative solutions, and budget-friendly upgrades that homeowners can tackle with confidence. Jackson enjoys breaking down complex projects into simple, step-by-step guidance, helping readers choose the right materials, tools, and techniques for the job. His goal is to make DIY more approachable while inspiring people to take on projects themselves and create spaces that are both functional and personal.




No Comments